


Acoustics can be a daunting and overwhelming area to tackle in your studio.
It involves a good amount of math, physics, and finding consistent reliable information. All of this can be tough.
That’s why our primary goal at Music City Acoustics is to simplify the process of treating your studio, so you can focus on the sound of your music, not the sound of your room.
If you’ve made it this far, you’ve probably already been writing, recording, and making music for a while now. It is also a fair bet that you have a quality microphone or two, pre-amps, compressors, and a great pair of speakers. Those things are exciting – who doesn’t love waiting for FedEx to drop off our new piece of gear and ripping into the box?
What you most likely haven't spent is a whole lot of time thinking about the acoustics in your room. Fair enough, acoustic panels are not exciting and sexy in the same way other gear is. But, what if there is a way to make your instruments, microphones, and gear work better, sound better, and make you a better performer, engineer, and producer?
The good news – there is. We’re going to discuss how to do just that in this article.
Here is everything we will cover in this article. Feel free to jump around and let us know if you have any questions.
Proper room layout for mixing
For this article, we will approach things assuming you are building a production/mixing room or an all-in-one home studio. Before we begin discussing Acoustic Panels, Bass Traps, and other acoustic treatments, we’ll need to determine how your room will be laid out. Nine times out of ten, if you are doing a lot of listening through your studio monitors (for the remainder of this article we’ll assume you are) you will want to set up the room with your speakers shooting down the longest dimension of the room. The exceptions to this typically occur when a room has similar length and width dimensions and/or if there are significant obstacles to treating important areas (i.e. doors, windows, etc.).

We favor this layout because it provides a longer path for the sound waves emanating from your speakers to travel before they hit the rear wall of the room and are reflected back towards the listening position. Without proper bass trapping, this can cause significant peaks and dips in your room, particularly in the low end (more on this to come in the bass trapping section below). If you aren’t sure which way to layout your room, fill out our Free Room Advice Form.
Proper speaker / monitor placement and listening position
We are often asked if you should position your speakers before or after you’ve installed acoustic panels. I always find this to be a bit like, “What came first, the chicken or the egg?” In truth, it is best to do both. Yes, it is a little more work, but it will not only lead to your room sounding better, it will also help you put a few less holes in the walls when installing your panels.
Here is a step-by-step guide to setting up your speakers and listening position:

1. Place your desk and chair so when sitting, your head (listening position) is at 38 percent of the room’s length from the front wall. To find this, measure the length of your room and multiply it by .38. It is easiest to do this calculation using inches.
2. Find the center of the room between the left and right walls and center your desk and chair on that spot. Maintaining this symmetry between the side walls is crucial.
3. Position your studio monitors right up against the front wall. We highly recommend having them on speaker stands.
4. Your tweeters should be at your ear height when sitting. Some three-way speakers use the mid-range driver as the acoustic axis, so check your manual.
5. Angle each studio monitor in towards the listening position 30°.
6. The distance from the listening position to the tweeters will determine how far apart your speakers need to be (tweeter to tweeter). Use this distance to create a equilateral triangle by either moving your speakers closer together or farther apart from each other. This will vary from room to room.
Where should I start with acoustic treatment in my room or studio space?
When we are designing studios, we like to think of them as a system made up of various Acoustic Panels, Bass Traps, Diffusers, and treatments. Each piece of acoustic treatment is just one small part of the puzzle that, as a whole, can make incredible changes to the sonic-scape of your room. However, that doesn’t mean you shouldn’t prioritize certain areas or that you should treat the whole room at once.
Installing your acoustic treatment incrementally is actually very useful. It allows you to treat all of the problematic reflection areas, control the decay time, avoid over-treating the room, and make adjustments as needed. This approach hones in on the acoustic treatments that work best for your room and is also the most cost-effective. Remember, acoustics is just as much an art as it is a science.
Here is the order we recommend for acoustically treating home studios and listening rooms.
1. Treat the early reflections
The first reflections you hear also happen to be the first points you should treat in your room with acoustic panels. These early reflections are sounds that have left your speakers, reflect off of the closest walls or boundaries in the room, and then arrive back at the listening position.
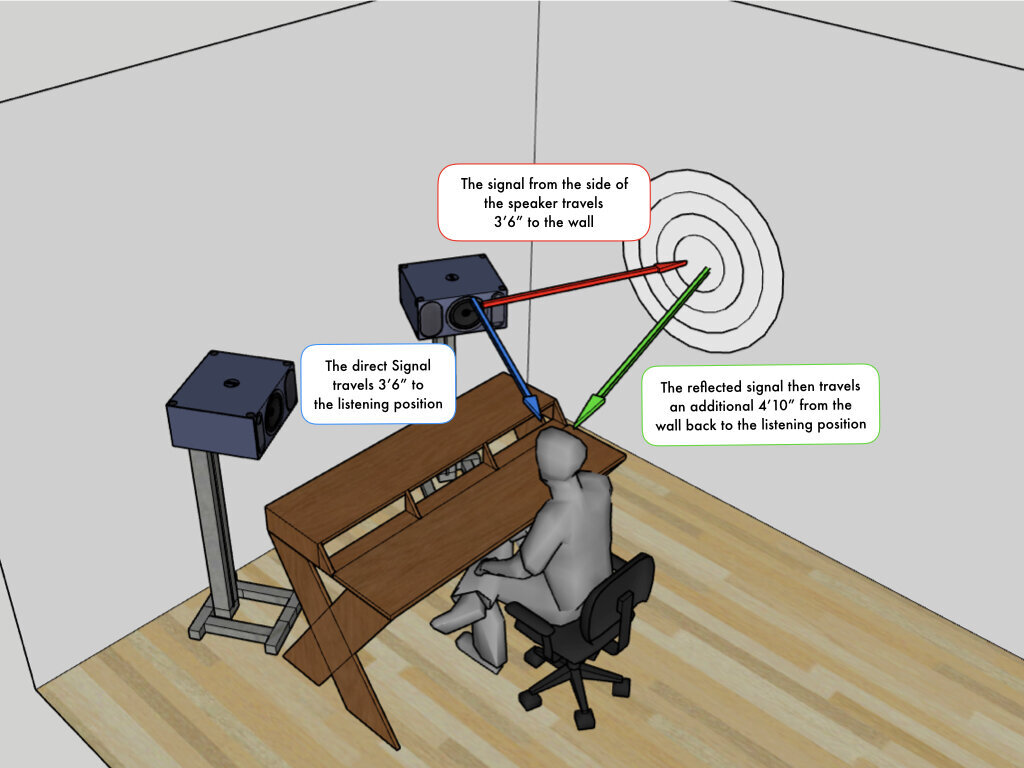
The path of the reflected sound is longer than the path of the direct sound, so it arrives at the listening position later. This time difference between the two signals results in comb filtering/ time smearing. We hear this as a loss of clarity, imaging, and depth of field. Your room is now imparting its own sound on the recorded material, making it harder to make important mix and production decisions.
The end-result is a sound that is significantly distorted from what has actually been recorded. Treating early reflections with Broadband Acoustic Panels will improve the clarity, stereo image, and depth of your listening environment. Early reflections can be treated with Bass Traps and Hi/Mid Acoustic Panels, as well. Keep in mind, there is a direct correlation to panel thickness and their ability to absorb low frequencies.
2. Treat the rear wall
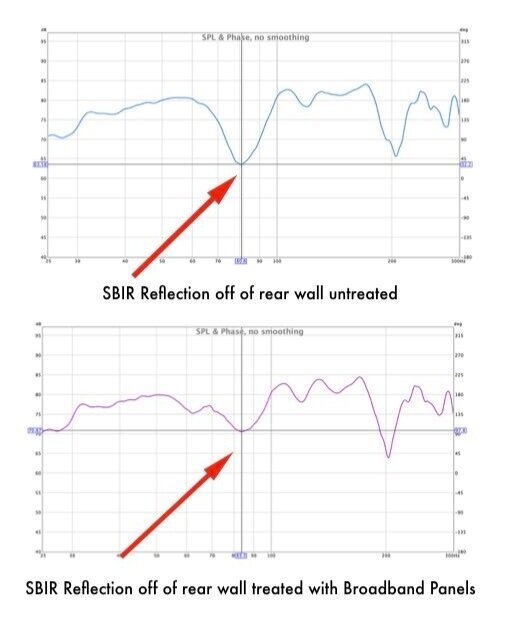
As we mentioned in the room layout section above, treating the rear wall of your studio is especially important because your speakers are pointed directly towards it. This means there is a great deal of energy coming out of your speakers and firing directly at the rear wall. Without proper acoustic treatment to absorb that energy, it will bounce off of the rear wall and come right back to the listening position. The result will be a very inconsistent low-frequency response with massive dips and peaks caused by SBIR that cannot be fixed through EQ or room correction software.
When treating the rear wall of your studio, bigger really is better. For context, commercial studios are often built with up to six feet of bass trapping on the sidewalls, rear wall, and ceiling. SIX FEET!

Here is a look inside the back wall bass trap Music City Acoustics designed and built for producer Collin Pastore.
Obviously, most of us don’t have the space or budget to get anywhere near six-foot bass trapping. We don’t say this to deter you, only to point out that 2 inches of Rockwool or Owens Corning 703 is not going to cut it when you are trying to absorb low/sub frequencies. For your rear wall Bass Traps, think big and make them as thick as possible. Our Bass Trap Panels and Broadband Panels work great here but when space allows, we’ll often build custom bass traps up to two feet deep.
3. Treat the ceiling

(A ceiling cloud was installed above the listening position for additional absorption. The rest of the ceiling has 4” of mineral wool.
The ceiling may not be the first area to cross your mind when considering what to treat, but it is hugely important for a couple of reasons. First and foremost, it is often the closest boundary to the listening position. If you are in a room with 8ft ceilings (like most), your ceiling is only 4ft above your head and likely closer than the side, front, or rear walls.
This can create some nasty effects from early reflections coming back down to the listening position, particularly if you have speakers that have a large off-axis vertical dispersion. This will make it difficult to hear panning, depth from reverbs and delays, and distort the frequency response.
Acoustic Panels used as a ceiling cloud above your speakers and listening position is the perfect way to alleviate these issues. Because the vertical axis of your room is not immune to axial modes, we recommend using Bass Traps here or broadband panels if you need the extra height. Just like treating the rear wall, bigger is better for the ceiling. With 8 and 9 ft ceiling heights being so common, most rooms will have a bad resonance at the listening position between 120Hz and 140Hz. Have you found where yours falls yet? This is the second floor to ceiling axial mode (0,0,2) causing horrific boominess to acoustics guitars, vocals, bass, etc.
4. Treat the corners

Here we go: The corners of your room are where you can really start to gain control of the low frequencies and stop them from wreaking havoc on the room response and monitoring. It is crucial to treat to the corners because all room modes terminate here and their SPL (sound pressure level) is building up by 3dB at each boundary. That means in your dihedral corners, SPL increases by 6dB and in the Trihedral corners SPL is increasing by 9dB. In an untreated room all of this energy is building up with nowhere to go and nothing to absorb it. It moves around freely bouncing back and forth between parallel walls, jumping off of adjacent walls, and having a party that you want no part of.
As this energy is bouncing around and building up in the corners and off the walls, it is causing massive dips and peaks in the frequency response of your room, often times larger than 30dB. Think about mixing with an EQ boosting 30dB at certain frequencies and cutting 30dB at others on your mix bus. Doesn’t sound too fun does it?
Acoustically treating your corners with Tri-Corner Bass Traps, super chunks, and Tuned Membrane Traps can help thwart unruly low end and reduce the impact of the corners. This brings us to the difference between porous absorbers, also known as velocity absorbers, and tuned membrane traps or pressure absorbers.
Porous vs. pressure absorbers

Porous absorbers are your typical acoustic panel or super chunk bass trap. They work by implementing a porous material, such as Owens Corning 703, that sound waves struggle to find a path through. As sound waves are fighting their way through all of the tiny openings within the porous material some of their energy is lost, preventing it from being reflected back into your room. This requires the sound waves to be traveling at a high velocity. However, at the boundaries of a room, velocity is low. This can make it challenging to get good results with porous absorbers when they are placed up against a wall or without very large depths (think 2+ feet).
While the velocity of waveforms is very low at room boundaries, sound pressure is very high. Recall the increase in sound pressure level found in the corners we discussed above. This means that where porous absorbers may not provide the best results, we can implement pressure absorbers such as Tuned Membrane Bass Traps.

These devices use a dense membrane that resonates at a specific frequency based on the depth of the unit. When the membrane starts to resonate, it is absorbing energy at that frequency, thus reducing its reflections and resonance in the room.
Unlike porous absorbers that are broadband in nature, meaning they absorb a wide range of frequencies, pressure absorbers are tuned to a center frequency and will only absorb energy close to it. This makes them particularly useful when trying to control resonances from room modes and the long decay times of low frequencies.
Approaches to treating the corners of your room

Straddle the corner
The most bang for your buck approach is to straddle the corner with an Acoustic Panel. Anything less than 4 inches here won’t cut it. Pushing panels away from boundaries, thus leaving an air gap behind the treatment, enables them to be effective further down into the frequency spectrum and increase its Noise Reduction Coefficients (NRC) at all frequencies. This can be done in any corner of your room. We recommend starting with the floor-to-ceiling corners, but don’t forget about the soffit corners either. They are a great way to get additional low-end control without losing valuable square footage in your room.

Superchunks
Filling the entire corner with large quantities of mineral wool works great, but require a lot of space and material. These should typically be a minimum of 2ft deep. This results in some challenges when it comes to prefabricated products, but if you are a DIYer or are having a studio custom built, this can be the way to go. We often custom build these for studios where large broadband bass traps are required. On a smaller scale you can also use our Tri-Corner Bass Traps.

Tuned membrane traps
These acoustic traps can be installed in the corners and other high-pressure zones (these can be found with measurement software or an SPL meter) to deal with room mode issues below 100Hz . Unlike broadband porous absorbers, membrane traps are tuned to specific frequencies and have a narrow effective absorption range or “Q”. This makes them perfect for controlling unyielding room resonances and large low frequency wavelengths. Having a narrow Q is also helpful when concerns of absorbing too much high and mid-frequency energy arise.
If the membrane traps will be placed in areas where reflections will be a problem, they can be outfitted with absorptive, reflective, or diffusive fronts. The other massive benefit of tuned membrane traps is their small footprint. Pressure absorbers can effectively absorb down to 30Hz with only a 16-inch depth. In order to achieve effective absorption with a porous absorber that low would require a depth of several feet. That wouldn’t leave you with much room to work, would it?
5. Treat the front wall
Not to be left out, treating the front wall of your studio can take your monitoring to the next level. Most studio monitors are fairly directional, meaning that most of the sound coming out of them is firing in the direction they are aimed. However, some sound will still come out of the back and sides of speakers, particularly at low frequencies. When these sounds come out of the back of a speaker they are traveling towards the front wall, and when they strike the wall, they are reflected back to the listening position.

As you may recall from the issues caused by early reflections and reflections off the back wall, these reflections will result in sound waves adding and subtracting from one another at the listening position due to their timing differences. Sonically, you’ll hear this as phasing, a lack of clarity, a diminished sense of width and depth, and significant dips in the low frequencies caused by SBIR reflections.
Fortunately, if you follow the speaker placement guidelines we discussed previously, your speakers will likely be up against or close to the front wall. With this speaker placement and Broadband or Bass Trap Panels installed on the wall behind them, you can eliminate the SBIR dips and improve the imaging, depth of field and clarity of your speakers.
6. Treat the back half of the room (late reflections and decay time control)
Up to this point, we have focused on acoustically treating areas in your studio around the immediate and severe problem causers – early reflections, SBIR reflections, room modes, etc. From the rendering below, you can see this still leaves a lot of your room susceptible to issues with flutter echo, long decay times, and a lack of sonic clarity and definition.
Treating the areas outside of the early reflection zones, when done correctly, can take your monitoring environment to a whole new level.
They key is to not over treat the mid and high frequencies, sucking the life out of the room. Rooms that are too dry (have a decay time that is too short, typically less than .2 seconds) are fatiguing to work in and make it difficult to hear the sense of space in your work. Think reverbs and delays.

Over treated rooms in the high and mid frequencies will lead to recordings that sound dull and lifeless. With that in mind, the key here is balancing out your acoustic treatment materials.
Diffusers, Space Coupling Diffusers, reflectors, and acoustic panels can be strategically placed to fine tune the decay time of your room, prevent any long discrete echoes from arriving at the listening position, and utilize this space to make sure your room isn’t too dead sounding.
The end – you made it!
If you have made it this far, we hope you found this primer on home studio acoustics helpful and informative. You now have a solid foundation to approach treating or improving your studio. If you still have any questions about how to best treat your room, please reach out to us. We would love to help you with your room in any way we can. Thanks for reading!

